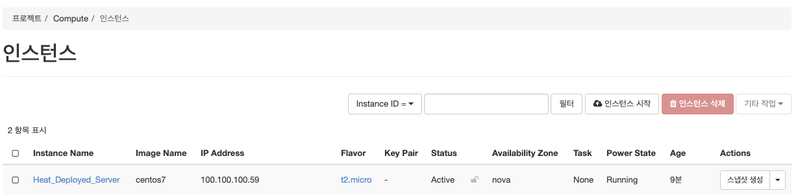
1) 오픈스택 히트(오케스트레이션 서비스) ::설정 및 설치
dnf --enablerepo=centos-openstack-victoria,powertools -y install openstack-heat-common python3-heatclient
(2) 사용자 및 엔드포인트 추가
openstack user create --domain default --password-prompt heat 패스워드 설정 후
openstack role add --project service --user heat admin
openstack role create heat_stack_owner
openstack role create heat_stack_user

예시 화면
openstack role add --project admin --user admin heat_stack_owner
openstack service create --name heat --description "Openstack Orchestration" orchestration
openstack service create --name heat-cfn --description "Openstack Orchestration" cloudformation
heat_api=[네트워크 노드 IP]
openstack endpoint create --region RegionOne orchestration public http://$heat_api:8004/v1/%\(tenant_id\)s
openstack endpoint create --region RegionOne orchestration internal http://$heat_api:8004/v1/%\(tenant_id\)s
openstack endpoint create --region RegionOne orchestration admin http://$heat_api:8004/v1/%\(tenant_id\)s
openstack endpoint create --region RegionOne cloudformation public http://$heat_api:8000/v1
openstack endpoint create --region RegionOne cloudformation internal http://$heat_api:8000/v1
openstack endpoint create --region RegionOne cloudformation admin http://$heat_api:8000/v1
openstack domain create --description "Stack projects and users" heat
openstack user create --domain heat --password servicepassword heat_domain_admin
openstack role add --domain heat --user heat_domain_admin admin
(3) DB 설정
mysql -u root -p

create database heat;
grant all privileges on heat.* to heat@'localhost' identified by '비밀번호 입력';
grant all privileges on heat.* to heat@'%' identified by '비밀번호 입력';
(4) 히트 API 설치
dnf --enablerepo=centos-openstack-victoria,powertools -y install openstack-heat-api openstack-heat-api-cfn openstack-heat-engine python3-heatclient
(5) 히트 설정
mv /etc/heat/heat.conf /etc/heat/heat.conf.org
vi /etc/heat/heat.conf
[DEFAULT]
			deferred_auth_method = trusts
			trusts_delegated_roles = heat_stack_owner
			heat_metadata_server_url = http://네트워크 노드 IP:8000
			heat_waitcondition_server_url = http://네트워크 노드 IP:8000/v1/waitcondition
			heat_watch_server_url = http://네트워크 노드 IP:8003
			heat_stack_user_role = heat_stack_user
			stack_user_domain_name = heat
			stack_domain_admin = heat_domain_admin
			stack_domain_admin_password = 설정할 비번
			transport_url = rabbit://openstack:rabbitmq비번@ 컨트롤러 노드 IP
[database]
			connection = mysql+pymysql://heat:설정할 비번@ 컨트롤러 노드 IP/heat

[clients_keystone]
			auth_uri = http://컨트롤러 노드 IP:5000
[ec2authtoken]
			auth_uri = http://컨트롤러 노드 IP:5000
[heat_api]
			bind_host = 0.0.0.0
			bind_port = 8004
[heat_api_cfn]
			bind_host = 0.0.0.0
			bind_port = 8000
[keystone_authtoken]
			www_authenticate_uri = http://컨트롤러 노드 IP:5000
			auth_url = http://컨트롤러 노드 IP:5000
			memcached_servers = 컨트롤러 노드 IP:11211
			auth_type = password
			project_domain_name = default
			user_domain_name = default
			project_name = service
			username = heat
			password = 설정할 비번

[trustee]
			auth_plugin = password
			auth_url = http://컨트롤러 노드 IP:5000
			username = heat
			password = 설정할 비번
			user_domain_name = default
chgrp heat /etc/heat/heat.conf
chmod 640 /etc/heat/heat.conf
su -s /bin/bash heat -c "heat-manage db_sync"
systemctl enable openstack-heat-api openstack-heat-api-cfn openstack-heat-engine
systemctl restart openstack-heat-api openstack-heat-api-cfn openstack-heat-engine
2) 오픈스택 히트 사용해보기
(1) yml,yaml 파일
(2) 샘플 파일 실행해보기
vi sample.yml
heat_template_version: 2018-08-31
description: Heat Sample Template

parameters:
ImageID:
type: string
    description: Image used to boot a server
  NetID:
type: string
    description: Network ID for the server

resources:
server1:
type: OS::Nova::Server
    properties:
name: "Heat_Deployed_Server"
image: { get_param: ImageID }
flavor: "m1.small"
networks:
- network: { get_param: NetID }
outputs:
server1_private_ip:
description: IP address of the server in the private network
    value: { get_attr: [ server1, first_address ] }
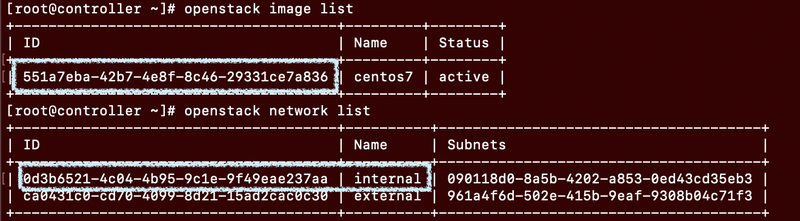
openstack stack create -t sample.yml --parameter "ImageID=[이미지 ID];NetID=[internal 네트워크의 ID]" Sample-Stack
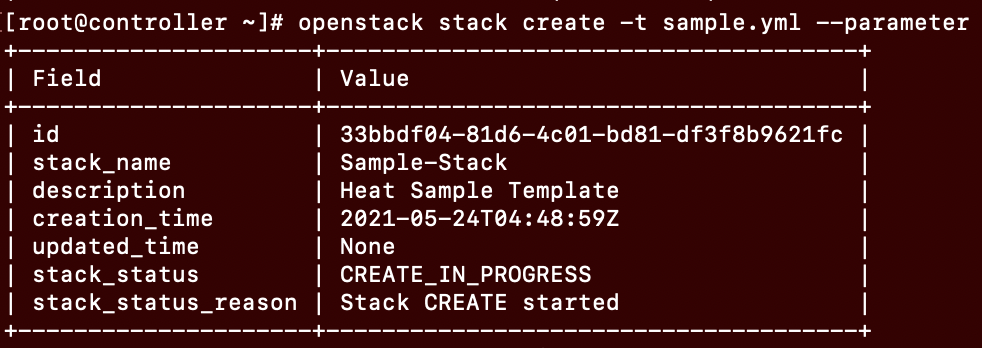
openstack stack list